In an earlier post, I explained how to add Expires Headers in Apache web server configuration. But what if you were running Nginx to serve your website. In this post, I am going to show how you can add expires headers without using any plugins. In addition to adding headers, you should also enable other cache techniques to reduce the load on your database. I have used Redis on my server and explained how to enable that in this post.
Background
A typical website consists of HTML, CSS and javascript files at the very least. In the case of most sites, the CSS and javascript are fairly static i.e. these files do not change often, only the HTML changes from page to page.
One of the tricks to make websites load faster is to make a browser cache frequently used assets. If your user visits multiple pages on your website, there is no need for their browser to fetch the CSS and javascript after the fist page visit.
Adding Expires Headers tells a browser to decide if the file needs to be fetched from the server or if it can be reloaded from disk or memory cache. These headers don’t make any impact on the first visit of the user. However, this technique cuts down the number of HTTP requests a user’s browser must make to render a subsequent page. This also applies for returning users and decreases load time for website pages. The longer you can afford to cache assets the better it will be for returning users.
There is one thing to keep in mind though, if you ask browsers to cache assets for a very long time, then users may not see the changes you make in your CSS and javascript right away. There are ways you can employ to cache bust these CSS and javascript resource, but you do have to decide how long you are willing to wait in some cases for users to see new functionality.
Test Setup
I took a screenshot of my desktop and put the image (a png file) inside my web server root to use as a test. I then opened a browser and requested the image.png file and confirmed that the ‘Response Headers’ at this time do not contain a Cache-Control header. After we have modified our configuration, we will do another test to confirm if our change worked.
Procedure
To accomplish this, you will need root access to your server. We have to edit the ngxin configuration and restart it. both of these actions will require you to elevate your privileges and become the root user.
Nginx files are usually located in folder /etc/
In my example, I am editing /etc/nginx/sites-enabled/default
# Expires map
map $sent_http_content_type $expires {
    default                    off;
    text/css                   15m;
    application/javascript     15m;
    ~image/                    15m;
}

server {
    listen       80;
    server_name  example.com;

    expires $expires;

    location / {
        root         /www;
        index  index.html;
    }
}
We first define a map which basically defines a variable. Parameters inside the map block specify a mapping between source and resulting values.
In the configuration above I have set the default to off which is basically no caching. For other types, I set it to 15 minutes. Then in the server block, the expires $expires; line references the map.
Note: On your site, you would use a longer time period. In my Apache configuration I set it to 7 days.
On most recent Linux servers, you can restart nginx service using the command.
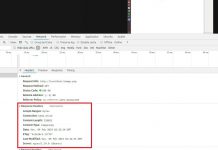
systemctl restart nginx.serviceLet us run a test using our browser and see if we can spot the Cache-Control headers. Refresh the image request and look for the ‘Response Headers’.

We can clearly see in the above image that the Cache-Control: max-age=900 is visible now.
It is a good idea to set the headers by file type as it gives you better control over how long each file type will be cached. Images rarely change, therefore you could set the cache period even longer, say 6 months or one year if you wish.


